Monday, November 23, 2009

How to apply false eyelashes tutorial

Do you wish you have those gloriously long and thick looking eyelashes? Eyelashes have always been a sign of femininity and definition of beauty. If you want longer looking eyelashes the easiest solution is to apply false eyelashes. So, now how to apply false eyelashes? I hope that you'll find the tutorial below useful:)


Various design of fake eyelashes available here


Here's the step by step guide on how to apply false eyelashes:
  1. Choose the type of false eyelashes design that you like

  2. Measure the length of the false eyelash by placing it on your eyes. If it is too long, cut it on the outer side of it (the part with longer lashes). You can use a small scissor to do this.

  3. Apply lash glue onto the base/bend of the false eyelashes. You can use a toothpick to hold a bit of the glue and apply it evenly on the base of the lashes from one end to the other.

  4. You'll need to wait about 30-45 seconds for the glue to be a little bit dry or tacky so that it won't move about after it is placed.
  5. Place the fake eyelashes as close to the lash line as possible. Stick it in the middle first. Then use your fingers or twizzer to push then to the eyelid on both ends.

  6. Use your fingers to press together the fake eyelashes to your eyelash and the lash line so that it'll hold firm

  7. In case if there is a small gap between the lash line and the line where you manage to paste the false lashes, just use eye liner to camouflage the gap ;)

  8. Blink blink ^^* and yes, you're done!!
Also, what a better way on learning how to apply fake eyelashes than to see it yourself. Here's one of my favourite video which guide you through all the process.


Tuesday, September 8, 2009

How to repair cracked heels?

Cracked heels or heel fissures is not a preety sight especially for those to loves wearing sandals or open sole shoes. The linear cut wounds or cracks on the heel initially affects the top surface level of the skin called epidermis. But, sometimes, this crack or fissures might deepen and causes pain once it cuts though the inner layer of the skin called dermis.

One of the main reasons for cracked heels is because we don't take enough care of it. For example, if it were your face skin, you'll definately take care of it, washing it with facial wash and putting on moisturizer and maybe even serum so that it look fresh and radiant. But your feet, the part of the skin which endure lots of impact while walking or even standing and have to withstand harsh surfaces is always being forgotten.

Our heels usually are dry and thicker compared to other parts of the skin. If excessive feet activity is not balanced with good caring of you feet, the dry skin around the heel will soon crack or peel.


Cracked heel remedy:


  1. Soak you feet with lemon juice or warm soapy water for 10 minutes and use a brush to lightly brush off dirt trapped within the cracked heel.

  2. Use any moisturizer, shortening or hydrogenated vegetable oil and apply it generously on your cracked heel. Then, wear a pair of socks and leave it overnite. Repeat till the cracked heels are repaired. This might take about a week.
The above remedy is easy to do and all you need might already available in your home. But, I would like to recommand a product, which is a specially formulated foot cream if you want a faster result. You can read the product review here:
Cracked foot cream review Best cracked foot repair cream


Tuesday, August 18, 2009

Hisamitsu Lifecella Orange Face Mask review

I've always seen Hisamitsu Lifecella Orange Face Mask selling over the counter in many shops. But have not tried it before. Just recently, I've bought it, in fact i bought 8 of them. Ok, they were on sale, so that's why I bought so many of them.

The first time I tried it, I was quite surprise. This lifecella mask is not like other face masks which are normally wet and messy. The mask is a gel type. Imagine this, a piece of orange color cloth, inner side is a film of gel or jelly and the outer side is dry and clean cloth surface. The gel or jelly contains a lot of the good stuff for you skin. The longer you put it on the skin, you'll notice the thinner the gel or jelly will be as the nutrients are being absorbed through the skin. Also the mask is separated into 2 parts; top and bottom.

How to use:
After washing your skin (or for better effect, exfoliate your skin), pat dry your face and apply the gel mask on the skin. According to the instruction from the wrapper, leave it for 15 minutes. However, I like to leave it longer since it is so convenient and non messy. You don't have to rinse after using. Recommanded to use it twice a week. You can also use it everyday.

Benefits of Lifecella Orange Face Mask:
  • Simple and convenient to use
  • Non messy - you can even wear your spectacles (if you use them) and go about doing your daily routine in the house.
  • Skin have a nice cool feeling even long after removing it. Approximate 3 hours and longer.
  • Skin is well moisturized. Skin remained oil free even without moisturizer for half a day.
  • Relaxes the skin

However, it is required to use this mask often for a noticable effect on the skin. Have you use it before? If yes, what do you think about this face mask?

Saturday, August 8, 2009

Tips on plucking and shaping your eyebrows

Ouch... plucking eyebrow is never fun and always painful. But, unless you're born with perfect eyebrows plucking and shaping your eyebrow is a must to look presentable and give you a boost of confidence.


TOP 8 tips on plucking and shaping your eyebrows

  1. Ask for a professional help to shape for the first time (sort of getting the blueprint). Then, just trim or pluck the other newly grown hair outside the shaped eyebrow time after time.

  2. Use a good quality tweezers. It can fasten the procedure by avoiding it from slipping due to the oil or breaking the hair halfway.

  3. Consider threading your eyebrows instead of plucking using tweezer or waxing. Refer to the threading eyebrow post here.

  4. Plucking your eyebrow can be quite painful. Minimize the pain from plucking your eyebrow using the tip in my previous post here : Tips to minimize pain when plucking eyebrow

  5. If you have to shape your eyebrow yourself, do look at more tutorial first and understand fully how to nicely shape your eyebrow. Watch the the eyebrow shaping tutorial video here again.

  6. Always use a eyebrow pencil (white/black/other contrasting color of your skin and hair) to mark the area where hairs should be removed.

  7. Always check back the whole picture of your eyebrow after a few plucks. This will ensure that you don't over pluck. Less is more here. If you are doubtful whether to pluck a certain strand or not.. then don't pluck it. Wait till it really annoys you and you are certain that strand should not be there.. then pluck it.

  8. Practice makes perfect. The more you practice the more you'll know how to shape and pluck your eyebrow effectively.

Friday, August 7, 2009

Threading eyebrows tips and how to

Threading eyebrows is gainning popularity nowadays. Threading is an ancient method hair removal originated from China, Middle East and India. It can be used to remove not only eyebrows, also other facial hair from upper lips, cheek, sideburns, etc and even leg hairs:P.

How to thread eyebrows?
Basically, eyebrow threading uses cotton thread which tied together at the end to create a loop and then twisting it in the middle a few times. Using this cotton thread and your fingers, place the thread on the skin where you want to remove the hairs. Use your finger to move the twisted part of the thread over it to remove unwanted or stray hair.

Confused? I was before too. So, let's speed up thing by watching the video tutorial below. It also has very useful eyebrow shaping tips you should know before threading your eyebrows.


Eyebrows threading pros and cons
Pros:
  1. Less painful compared to plucking eyebrows using waxing or tweezers
  2. Faster as it can remove a line of hairs in single movement
  3. Neat and precise. Since threading eyebrows method removes hair in a line, it is helps while shaping eyebrows.
  4. Better than waxing eyebrows because waxing takes off part of the upper layer of the skin and might cause premature wrinkle.
  5. Suitable for sensitive skin as theading does not use any chemical that might cause allergic reaction
Cons:
  1. Eyebrow threading needs some skill and not as straight forward as using tweezers.
  2. It not done correctly, it might cause hair breakage, ingrown hair, out of shape brows and unnecessary pain. However this disadvantages also apply when shaping and plucking eyebrows using tweezers and wax.

Plucking and Shaping Eyebrows Tutorial Video

What is a better way to learn how to shape your eyebrows than watching a video tutorial on shaping eyebrows. Here's and informative video on how to shape your eyebrows by using tweezers.

Tips to minimize the pain when plucking eyebrows

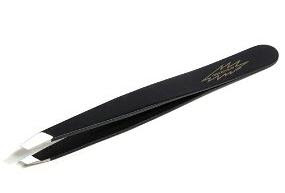
Tweezerman Stainless Steel Slant Tweezer


Tips to minimize the pain of plucking eyebrows using tweezers.

  1. Invest in a good tweezers (e.g Tweezerman tweezers). Saves plucking time and avoid mistakes like slipping due to the oil or breaking the hair halfway.
  2. Rub ice on the eyebrows for about 1 minute to numb the skin around it. Repeat when required
  3. Wet a piece of towel with warm water and place it over the eyebrows for awhile open the pores. Alternatively, pluck your eyebrows after a hot shower. The hair will be able to be plucked with less resistance as the pores are opened.
  4. Pluck your eyebrows the week after your period begin. Skin is less sensitive toward the pain by then
  5. Tout the skin in the direction of hair growth while plucking the eyebrows
  6. Pluck one strand of hair at a time
  7. Pluck near to the roots with a short and fast action
  8. Pluck in the direction of hair growth
  9. Apply Anbesol, Orajel or any children teething gel on the brows to reduce painOrajel Mouth Sore Medicine - .18 ozAnbesol Maximum Strength Oral Anesthetic Gel, .33-Ounce Tubes (Pack of 3)
  10. Apply aloe vera gel after plucking to reduce the redness and soothes painFruit Of The Earth Aloe Vera 100% Gel 24 oz (680 g)Fruit Of The Earth Aloe Vera 

Monday, August 3, 2009

How to whiten yellow finger and toe nails naturally ?

Here's how to whiten nails naturally in just a few simple step. Yellow stained finger nail and toe nails are definately not flattering. Frequent use of dark nail polish are one of the main factors causing yellow nails. Also, for some part of Asian countries, where the food uses a lot of spices (especially tumeric or 'kunyit' in Malay language), this can easily cause yellow nails if they use their fingers to handle food.


If you are interested on how to whiten nails right at the comfort of your own home, below are several method on how to whiten nails naturally that you can try :)


Use baking soda and hyrogen peroxide to bleach nails
Mix1 tablespoon of 3% hydrogen peroxide and 2 tablespoon of baking soda to create a paste. Apply the paste all over each nails and also under the tips on the nails. Leave it about 5 minutes and then wash off.
ARM & HAMMER Baking Soda - 12 lb. bagHydrogen Peroxide (3%) Plastic Bottle (4 oz)Hydrogen Peroxide (3%)

Use denture cleaner tablet
 Dissolve a tablet of denture cleaner and soak your nails for 15 minutes. Stain-Away Plus Dental Cleanser received good reviews in Amazon. It if can clean and brighten your denture well, it will work the to remove stains in your nails too:)
.Stain-Away Plus Dental Cleanser - 8.1 OzStain-Away Plus Dental Cleanser

Use toothpaste and toothbrush
Apply some toothpaste on your soft toothbrush and scrub your nails for a few minutes. You may leave them for another 5 minute for more effect.
Rembrandt Toothpaste, Intense Stain, Mint Flavor, 3-Ounce Tubes (Pack of 3)Rembrandt Toothpaste for removing intense stain

Lemon juice and peel to whiten nail naturally
You can opt to soak your nails with lemon juice diluted equal part with water for 10 - 15 minutes or rub the lemon peel or skin with their juice for 10 minutes. Lemon is a natural astringent to remove a lot of household stains also.

Use nail whitening pencil for a quick fix
Last but not least, if you want instant whitening effect, just use nail whitening pencil and run it underneath your nails. French manicure in a instant. You can find this nail whitening pencil from Amazon.

How to whiten teeth naturally?

Yellow teeth is not flattering. Do you wish you have those white sparking teeth to show whenever you smile? The ones like Simon Cowell's, it really stands out whenever he smiles in American Idol :P


Smile like you mean it:D

So, how can you whiten teeth naturally without spending a fortune on whitening kit? The best natural teeth whitening solution is to use baking soda and hydrogen peroxide. Baking soda helps to kill bacteria causing plaque and reduce acids that harm tooth enamel. Meanwhile, hydrogen peroxide also assist in removing the stain from the teeth. Both works well to whiten teeth naturally.


Things you need to prepare:
Church & Dwight Co 01170 Arm & Hammer Baking SodaBaking Soda                 Heritage Products Hydrogen Peroxide Mouthwash, 16-Ounces (Pack of 4)Hydrogen Peroxide
  • 1 tablespoons of baking soda
  • 1 tablespoons of hydrogen peroxide
  • Toothbrush
  • 1 small container with cover ( you may use small bowl with plastic wrapper also)

Steps to whiten teeth naturally:
  1. Before begin, it is not adviced to whiten teeth if you have cavities, gingivitis or any gum problems. See your dentist first.
  2. With that aside, take the containter and mix 1 tablespoons of baking soda and 1 tablespoons of hydrogen peroxide together. You may add more baking soda till it has the concentration of the normal toothpaste.
  3. Apply the mixture on the toothbrush and brush normally. Leave the teeth whitener mixture for about 2 minutes and rinse it throughly afterwards. Do not swallow.
  4. Keep the remainder of the mixture for your next use. You can cover the containter with its lit or if you are using a bowl, cover it with a plastic wrapper to avoid the mixture from drying up.


Please take note that only use this natural teeth whitening solution ONCE a week only. Too often might cause damage to the gum tissue.

Wednesday, July 29, 2009

Brittle nails causes, prevention and treatment

Brittle fingernails can be painful and it is also not a pretty sight. In order to prevent and treat brittle nails, let's first learn the causes of brittle nails.

Causes of brittle nails:
  1. repeated wetting and drying of fingernails
  2. repeated or excessive exposure to harsh solvents (detergent, soap and even nail polish remover)
  3. Harsh treatment of hands and nails due to work (e.g construction, gardening and other manual labor)
  4. underlying medical condition, such as Raynaud's disease, low thyroid function, skin diseases (psoriasis, lichen planus, alopecia areata) , endocrine disorders, tuberculosis, Sjogren's syndrome, malnutrition and even Selenium poisoning.
Here I'll only discuss the remedy for brittle nails caused by the first three causes above and not due to underlying medical conditions.
Tips to prevent brittle nails:
  1. Wear rubber gloves when doing any work that exposes your fingernails to water, detergent or other solvents such as washing dishes, washing cloths, gardening, etc.
    Playtex HandSaver Gloves: XL
  2. If you are doing the work mentioned above for a longer duration, consider wearing a thin cotton glove under the rubber gloves to absorb the perspiration from the hand to avoid moisture on the nails.Dermatological cotton gloves - ladies regular, cara 82 - 1 pair
  3. Do manicure often and always keep your nails nicely trimmed to prevent crack or tear.
  4. Consider to trim nails right after shower or bath to achieve a more even and neat cut. Also use good quality ones to get a nice clean cut everytime. I recommand using Seki Edge Stainless Steel Fingernail Clipper as it one of the best to do the job.

    Seki Edge Stainless Steel Fingernail Clipper
  5. Avoid habits of nail biting or using your nails to pick on things such as removing staplers, twisting screws etc.
  6. Ensure you are getting enough nutrients so that the body can produce strong and healthy nails. Also message your fingers and nails several times a day to promote blood circulation in that area. This will help in absorption of nutrients.
  7. If your nails are dry, apply moisturizer or olive oil on it and message them in.

Treatment for brittle nails:
Taking biotin supplements helps in promoting thicker nail, faster growing nail and reduce nails tendency to split or break. You can read more about Biotin for hair skin and nail in my previous post here. Non the less, do consult your doctor before taking it as a safety measure.
Appearex Biotin Tablets, 2.5 mg, 84-Count Box Example of biotin supplement

Pore minimizing in 3 steps

Put your hands up if you have those pesky enlarge looking pores especially around the nose and cheek area. If you don't have, great. But really? Anyway, here are some of home remedy to minimize pores you can try:)


First step:
Always ensure that you keep your skin clean. If you wear makeup, clean your make up before going to sleep. One of the reason for enlarge pore is due to the pores clogged up by dirt, oil and even cosmetic products for extended period, making it even harder to minimize. Also, if you don't keep your skin clean, acne and blackheads might appear causing these enlarge pores. One cost effective product for deep cleansing your skin effectively is Neutrogena Pore Refining Cleanser. You can see the Amazon customer review from the link below.

Second step:
Use toners after washing your skin with a cleanser. Choose alcohol free toners or another solution is to use natural homemade toner using Apple Cider Vinegar. For more information on how to make Apple Cider Vinegar toner and benefits from it, please refer to my previous post.
Third step:
Exfoliate skin once a week and also use mask. Clay mask helps in reducing oiliness from skin and also helps in minimizing pores. You also can opt for a more cost effective solution which to use homemade mask using egg white to tighten pores. You can refer to the egg white mask recipe and steps in my previous post also.
Do try these basic pore refining tips and I hope these tips works for you. I'll add more tips on how to minize pore in my future post. Stay tuned :)

Thursday, July 23, 2009

Likas papaya soap for whitening skin and cure acne

Have you tried papaya soap before? You'll be surprise how good it is. I came to know about this product while searching for skin whitening solutions. The best brand that was recommended is Likas Papaya Soap. It is the first pure organic herbal soap of Philippines and has even won 2 awards:
  • 2003 National Consumers Quality Award for Hall of Fame Best Papaya Herbal Soap
  • 2003 Asia-Pacific Excellence Awards for Outstanding Papaya Herbal Soap

Original Likas Papaya Skin Whitening Herbal Soap


Upon seeing how much good reviews it got from the users (read from forums) I've decided to give it a try. If you see the user ratings in Amazon, all of them rate it with 5 stars. Wow, rite? You can click on the link or image to see it in Amazon. Anyway, here are the pros and cons I've discovered:


Pros (Benefits of using papaya soap):

  1. Even out skin tone(most important to me) and also whitens the skin a little bit. It might have been the exfoliating effect of papaya enzymes
  2. Skin feels smoother and gives natural glow to it. If you have dull complexion, do give it a try. The gentle exfoliating effect will help to remove the dull skin and replace it with a radiant glow instead.
  3. Lightens pimple scar, freckles and dark spots (dark underarm, joints, etc). I used to have dark tan on some parts of my back due to sun burn from swimming in the afternoon a year ago(never do this, it burns) . After using it for around 2 weeks, the skin tone on my back seems to even out. Two thumbs up for this :D.
  4. Helps in treating acne problem and to reduce redness. If used on face, remember to apply moisturiser as it is drying. If not, it might cause more breakouts. There are a few user with bad acne problem mentioned that after using papaya soap on their skin (face), they have lesser breakouts. You can read about it here: Likas Papaya Soap review.

Cons (Disadvantages or side effect of papaya soap):

  1. Drying. Remember to apply moisturizer if you have dry skin and avoid using it on the face if you have sensitive skin.

Original Likas Papaya Skin Whitening Herbal Soap


Do be careful when buying the soap as there are some fake ones in the market. Here are few of the guidelines for authentic Likas Papaya soap:

  • Each Likas Papaya soap is orange-schemed and carries the Mystica Logo throughout its packaging. The Mystica Logo is reflected which emanates rainbow rays and shines in the light.

  • Likas Papaya soap comes in a clean orange bar. There is no visible bits or bubbles inside it.

  • Likas Papaya soap is sold in bar form and packed in a box. The soap is not sold in as scraps, or as overruns.

  • Likas Papaya soap weighs exactly 135 grams.

  • Likas Papaya soap has no strong odor & has no harsh ingredients